 AWS Lambda와 S3로 이미지 업로드 시 resize + webp 자동 변환하기AWS Lambda and S3 for automatic resize + webp conversion on image upload
📅
들어가기 전에 🔗
최근 블로그 최적화를 끝낸 후 사용자가 크게 늘어나면서 Vercel에서 안내 메일이 오기 시작했습니다. 내용은 다음과 같습니다.
Your site is growing! Your free team promes-projects has used 75% of the included free tier usage for Image Optimization - Cache Writes (100,000 Writes). 당신의 사이트는 성장하고 있습니다! 무료 팀 promes-projects는 이미지 최적화 - 캐시 쓰기(100,000 쓰기)의 포함된 무료 사용량의 75%를 사용했습니다.
Next.js의 Image 태그는 자동으로 이미지를 최적화하여 제공하는 기능을 가지고 있습니다. 이 기능은 CDN을 통해 제공되며, 사용자가 이미지를 요청할 때마다 최적화된 이미지를 생성합니다. 하지만 이 과정에서 캐시가 쌓이게 되고, 무료 사용량을 초과하게 되면 추가 비용이 발생할 수 있습니다.
CDN을 사용해 이미지 최적화하기
저는 이미 CDN을 통해 캐시 서버로 이미지를 제공하고 있기 때문에, Vercel의 이미지 최적화 기능을 사용하지 않고도 충분히 빠른 속도로 이미지를 제공할 수 있습니다. 따라서, Vercel의
이미지 최적화 기능을 비활성화
하고, AWS S3와 Lambda를 활용하여 자동으로 이미지를 압축하는 방법만 추가한다면 기존과 같은 속도로 이미지를 제공할 수 있을 것이라고 판단했습니다.
그래서 AWS의 공식 문서를 참고하여 AWS Lambda와 S3를 활용한 이미지 업로드 시 자동으로 이미지를 리사이징하는 방법을 정리해보았습니다.S3 버킷 생성하기 🔗
먼저, 두 개의 S3 버킷을 생성합니다. 하나는 원본 이미지를 업로드할 버킷이고, 다른 하나는 최적화된 이미지를 저장할 버킷입니다.
🖐️
리전을 주의해서 설정해주세요. 서울 리전은 ap-northeast-2입니다예시:
original-image-bucket-promethumbnail-image-bucket-prome
S3 버킷은 AWS 콘솔에서 간단히 생성할 수 있으며, 버킷 이름은 고유해야 합니다. 설정은 모두 기본값으로 두고, 액세스는 비공개로 설정합니다. 버킷을 생성한 후, 두 개의 버킷이 생성되었는지 확인합니다.
IAM 권한 정책 및 실행 역할 만들기 🔗
Lambda가 S3 버킷과 CloudWatch 로그에 접근할 수 있도록 읽기와 쓰기 권한을 설정해야 합니다.
1단계: 정책 생성 🔗
두 개의 S3 버킷에 대한 읽기 및 쓰기 권한을 부여하는 IAM 정책을 생성합니다. AWS 콘솔에서 IAM → 정책 → "정책 생성"으로 이동하여 다음과 같은 정책을 생성합니다. IAM - 정책↗
{
    "Version": "2012-10-17",
    "Statement": [
        {
            "Effect": "Allow",
            "Action": [
                "logs:PutLogEvents",
                "logs:CreateLogGroup",
                "logs:CreateLogStream"
            ],
            "Resource": "arn:aws:logs:*:*:*"
        },
        {
            "Effect": "Allow",
            "Action": [
                "s3:GetObject"
            ],
            "Resource": "arn:aws:s3:::*/*"
        },
        {
            "Effect": "Allow",
            "Action": [
                "s3:PutObject"
            ],
            "Resource": "arn:aws:s3:::*/*"
        }
    ]
}
다음 버튼을 클릭 후 정책 이름을
LambdaS3Policy로 설정하고, 정책을 생성합니다. 이 정책은 Lambda 함수가 S3 버킷에 접근할 수 있도록 허용합니다.2단계: 역할 생성 🔗
IAM → 역할 → "역할 생성"으로 이동하여, Lambda 서비스를 선택하고 위에서 만든 정책을 연결합니다.
IAM - 역할↗

다음 버튼을 눌러 권한 추가 화면에서
LambdaS3Policy를 선택하고, 역할 이름을 LambdaS3Role로 설정 후 역할을 생성합니다.Lambda 함수 작성 및 배포 🔗
이제 Lambda 함수를 작성할 차례입니다. AWS Lambda는 서버리스 컴퓨팅 서비스로, 코드를 실행하기 위한 서버를 관리할 필요 없이 코드를 작성하고 배포할 수 있습니다.
Lambda 콘솔에서 "함수 생성"을 클릭하여 새 함수를 생성합니다. 다음과 같은 설정을 사용합니다. 특히 역할은 위에서 생성한
LambdaS3Role을 선택해야 합니다.
🖐️
리전을 꼭! S3와 동일한 리전으로 설정해야 합니다. 예를 들어, 서울 리전은 ap-northeast-2입니다.
그러면 작은 코드 편집기가 열립니다. 일단 트리거를 추가해보도록 하겠습니다. 트리거는 S3를 선택하고, 이벤트 유형은 PUT 으로 설정합니다. 이 설정은 S3 버킷에 이미지가 업로드될 때마다 Lambda 함수가 실행되도록 합니다.

본인 컴퓨터의 로컬 환경으로 이동하여 코드를 생성해야 합니다. (AWS Lambda 콘솔에서 코드를 작성할 수도 있지만, 로컬 환경에서 작성하는 것이 더 편리합니다.) 로컬 환경에서 Node.js를 사용하여 Lambda 함수를 작성합니다. Node.js가 설치되어 있지 않다면 Node.js 공식 웹사이트↗에서 다운로드하여 설치합니다.
mkdir resize-image
cd resize-image
npm init
resize-image 디렉토리로 이동하여
sharp 라이브러리를 설치합니다. sharp는 이미지 리사이징을 위한 라이브러리입니다.npm install --platform=linux --arch=x64 sharp@0.32.6그리고 해당 폴더에
index.mjs 파일을 생성합니다. 최종 폴더 구조는 다음과 같습니다.📦resize-image
┣ 📂node_modules
┣ 📜index.mjs
┣ 📜package-lock.json
┗ 📜package.json
이 파일은 Lambda 함수의 진입점이 됩니다. 아래 코드를 붙여넣습니다. 이 코드는 S3 버킷에 업로드된 이미지를 가져와서 리사이징한 후, 다른 S3 버킷에 저장하는 역할을 합니다.
aws resize 예시 코드
// dependencies
import { S3Client, GetObjectCommand, PutObjectCommand } from '@aws-sdk/client-s3';

import { Readable } from 'stream';

import sharp from 'sharp';
import util from 'util';


// create S3 client
const s3 = new S3Client({region: 'us-east-1'});

// define the handler function
export const handler = async (event, context) => {

// Read options from the event parameter and get the source bucket
console.log("Reading options from event:\n", util.inspect(event, {depth: 5}));
  const srcBucket = event.Records[0].s3.bucket.name;

// Object key may have spaces or unicode non-ASCII characters
const srcKey    = decodeURIComponent(event.Records[0].s3.object.key.replace(/\+/g, " "));
const dstBucket = srcBucket + "-resized";
const dstKey    = "resized-" + srcKey;

// Infer the image type from the file suffix
const typeMatch = srcKey.match(/\.([^.]*)$/);
if (!typeMatch) {
  console.log("Could not determine the image type.");
  return;
}

// Check that the image type is supported
const imageType = typeMatch[1].toLowerCase();
if (imageType != "jpg" && imageType != "png") {
  console.log(`Unsupported image type: ${imageType}`);
  return;
}

// Get the image from the source bucket. GetObjectCommand returns a stream.
try {
  const params = {
    Bucket: srcBucket,
    Key: srcKey
  };
  var response = await s3.send(new GetObjectCommand(params));
  var stream = response.Body;

// Convert stream to buffer to pass to sharp resize function.
  if (stream instanceof Readable) {
    var content_buffer = Buffer.concat(await stream.toArray());

  } else {
    throw new Error('Unknown object stream type');
  }


} catch (error) {
  console.log(error);
  return;
}


// set thumbnail width. Resize will set the height automatically to maintain aspect ratio.
const width  = 200;

// Use the sharp module to resize the image and save in a buffer.
try {
  var output_buffer = await sharp(content_buffer).resize(width).toBuffer();

} catch (error) {
  console.log(error);
  return;
}

// Upload the thumbnail image to the destination bucket
try {
  const destparams = {
    Bucket: dstBucket,
    Key: dstKey,
    Body: output_buffer,
    ContentType: "image"
  };

  const putResult = await s3.send(new PutObjectCommand(destparams));

  } catch (error) {
    console.log(error);
    return;
  }

  console.log('Successfully resized ' + srcBucket + '/' + srcKey +
    ' and uploaded to ' + dstBucket + '/' + dstKey);
  };
하지만 저는 리사이즈 + webp 변환이 필요했기 때문에 아래 코드를 사용했습니다.
region, bucket 이름
은 본인에 맞게 수정해주세요.
original-image-bucket-prome에 업로드된 이미지를 resized-image-bucket-prome에 리사이즈하여 저장합니다. 이때, 원본 이미지의 확장자에 따라 리사이즈 후 확장자를 변경합니다. 예를 들어, 원본 이미지가 image.jpg라면 리사이즈 후 image.webp로 저장됩니다. 만약 원본 이미지가 이미 webp라면 리사이즈만 진행합니다.
이 코드는 gif 같은 애니메이션 파일도 지원합니다.aws resize + webp 예시 코드
// dependencies
import {
  S3Client,
  GetObjectCommand,
  PutObjectCommand,
} from "@aws-sdk/client-s3";

import { Readable } from "stream";

import sharp from "sharp";

// create S3 client
const s3 = new S3Client({ region: "ap-northeast-2" });

// define the handler function
export const handler = async (event, context) => {
  const srcBucket = event.Records[0].s3.bucket.name;
  const srcKey = decodeURIComponent(
    event.Records[0].s3.object.key.replace(/\+/g, " ")
  );
  const dstBucket = "resized-image-bucket-prome"; // 리사이즈된 이미지를 저장할 버킷 이름
  const filename = srcKey.split("/").pop(); // 파일명만 추출
  const dstKey = `${filename.replace(/\.[^.]+$/, ".webp")}`;

  const typeMatch = srcKey.match(/\.([^.]*)$/);
  if (!typeMatch) {
    return;
  }

  const imageType = typeMatch[1].toLowerCase();

  // WebP 파일은 변환 없이 그대로 복사
  if (imageType === "webp") {
    try {
      const params = {
        Bucket: srcBucket,
        Key: srcKey,
      };
      var response = await s3.send(new GetObjectCommand(params));
      var stream = response.Body;

      if (stream instanceof Readable) {
        var content_buffer = Buffer.concat(await stream.toArray());
      } else {
        throw new Error("알 수 없는 객체 스트림 타입입니다");
      }

      const destparams = {
        Bucket: dstBucket,
        Key: dstKey,
        Body: content_buffer,
        ContentType: "image/webp",
      };

      await s3.send(new PutObjectCommand(destparams));
      return;
    } catch (error) {
      return;
    }
  }

  try {
    const params = {
      Bucket: srcBucket,
      Key: srcKey,
    };
    var response = await s3.send(new GetObjectCommand(params));
    var stream = response.Body;

    if (stream instanceof Readable) {
      var content_buffer = Buffer.concat(await stream.toArray());
    } else {
      throw new Error("알 수 없는 객체 스트림 타입입니다");
    }
  } catch (error) {
    return;
  }

  const width = 600;
  const height = 600;

  try {
    let sharpInstance = sharp(content_buffer, {
      animated: true, // 애니메이션 GIF 지원
      pages: -1, // 모든 프레임 처리
    }).resize(width, height, {
      fit: sharp.fit.inside,
    });

    var output_buffer = await sharpInstance
      .webp({
        lossless: false,
        animated: true, // 애니메이션 보존
      })
      .toBuffer();
  } catch (error) {
    return;
  }

  try {
    const destparams = {
      Bucket: dstBucket,
      Key: dstKey,
      Body: output_buffer,
      ContentType: "image/webp",
    };

    await s3.send(new PutObjectCommand(destparams));
  } catch (error) {
    return;
  }
};
resize-image 폴더의 하위 내용들을 압축하여 zip 파일로 만들어야 합니다.
index.mjs와 node_modules 폴더를 포함하여 zip 파일을 생성합니다. 이때, node_modules 폴더는 반드시 포함되어야 합니다. AWS Lambda는 Node.js 런타임을 사용하므로, 필요한 모든 종속성을 포함해야 합니다.
이렇게 생긴 zip 파일을 AWS Lambda 콘솔로 돌아가서 업로드합니다. "코드" 탭에서 "업로드" 버튼을 클릭하여 zip 파일을 선택합니다. 업로드가 완료되면 Lambda 함수가 생성됩니다.테스트 및 결과 확인 🔗
이제 Lambda 함수를 테스트할 차례입니다. S3 버킷에 이미지를 업로드하면 Lambda 함수가 자동으로 실행되며 리사이즈된 이미지가 다른 S3 버킷에 저장됩니다. 테스트를 위해
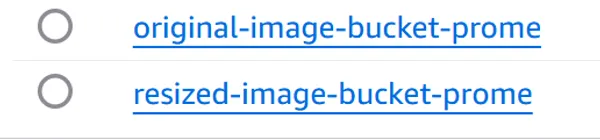
original-image-bucket-prome 버킷에 이미지를 업로드합니다.테스트 이벤트 생성 🔗
만일 작동이 잘 되지 않는다면 테스트 탭을 이용하여 직접 이벤트를 생성해볼 수 있습니다.
일단단
original-image-bucket-prome에 원하는 이미지를 업로드하고 테스트 탭으로 이동해 이벤트를 생성해주세요. 다음과 같이 S3 PUT 템플릿을 생성합니다.
아래의 JSON 이벤트를 본인에 맞게 총 4가지 속성을 수정해줍니다.
{
  "Records": [
    {
      "eventVersion": "2.0",
      "eventSource": "aws:s3",
      "awsRegion": "ap-northeast-2", // 리전
      "eventTime": "1970-01-01T00:00:00.000Z",
      "eventName": "ObjectCreated:Put",
      "userIdentity": {
        "principalId": "EXAMPLE"
      },
      "requestParameters": {
        "sourceIPAddress": "127.0.0.1"
      },
      "responseElements": {
        "x-amz-request-id": "EXAMPLE123456789",
        "x-amz-id-2": "EXAMPLE123/5678abcdefghijklambdaisawesome/mnopqrstuvwxyzABCDEFGH"
      },
      "s3": {
        "s3SchemaVersion": "1.0",
        "configurationId": "testConfigRule",
        "bucket": {
          "name": "original-image-bucket-prome", // 사진이 저장된된 버킷 이름
          "ownerIdentity": {
            "principalId": "EXAMPLE"
          },
          "arn": "arn:aws:s3:::original-image-bucket-prome" // 사진이 저장된된 버킷 ARN
        },
        "object": {
          "key": "1234.png", // 파일 이름
          "size": 1024,
          "eTag": "0123456789abcdef0123456789abcdef",
          "sequencer": "0A1B2C3D4E5F678901"
        }
      }
    }
  ]
}
테스트 버튼을 클릭하면 성공, 혹은 실패 메시지가 뜹니다. 성공했다면
resized-image-bucket-prome 버킷에 리사이즈된 이미지가 저장되어 있는지 확인합니다. 실패했다면 CloudWatch 로그를 확인하여 에러 메시지를 확인합니다.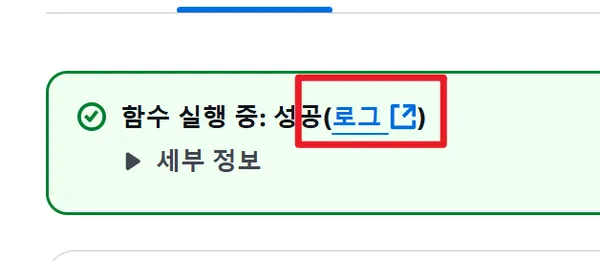
결론 🔗
이제 Vercel의 이미지 최적화 기능을 비활성화하고, AWS Lambda와 S3를 사용하여 이미지 업로드 시 자동으로 리사이징 및 webp 변환을 수행하는 방법을 배웠습니다. 이 방법은 서버리스 환경에서 이미지 처리 자동화를 구현하는 데 유용합니다. Lambda 함수를 사용하면 서버를 관리할 필요 없이 코드를 실행할 수 있으며, S3를 사용하여 이미지를 저장하고 관리할 수 있습니다. 이를 통해 블로그나 웹사이트의 성능을 향상시킬 수 있습니다.

리사이즈 전

리사이즈 후
이제 Vercel 이미지 최적화는 안녕이에요 ✋
module.exports = {
	images: {
		unoptimized: true,
	},
};